Laravel 8 Google Auth
How to Add a Google Login using Socialite on Laravel 8 with Jetstream
Starting a laravel 8 application with jetstream and then passing the login to Google shouldn’t be hard. There should be a github out that there where’s someone’s already done that, that you can just clone and go from there.
I didn’t find one, so I made one with a little help from here: https://www.nicesnippets.com/blog/laravel-8-socialite-login-with-google-gmail-account
Unfortunately, the instructions left me unable to login with google because of the teams in jetstream, so I had to code a decent bit more. Without further ado, here’s the github:
If you want to do this yourself, here’s how I did it.
Start by installing Laravel 8.
composer create-project --prefer-dist laravel/laravel socialiteThen add jetstream. CD into your project and type the following
composer require laravel/jetstreamNext, install and setup the project using the following commands:
php artisan jetstream:install livewire --teamsnpm install && npm run dev

php artisan migrate
Next, install socialite for social logins:
composer require laravel/socialiteAdd Socialite to the config/app.php. Scroll down and under ‘providers’, add Laravel\Socialite\SocialiteServiceProvider::class, and under ‘aliases’ add ‘Socialite’ => Laravel\Socialite\Facades\Socialite::class.
Configure it to work with google by adding the following to config/services.php
'google' => [
'client_id' => env('GOOGLE_CLIENT_ID'),
'client_secret' => env('GOOGLE_CLIENT_SECRET'),
'redirect' => 'http://your-callback-url',
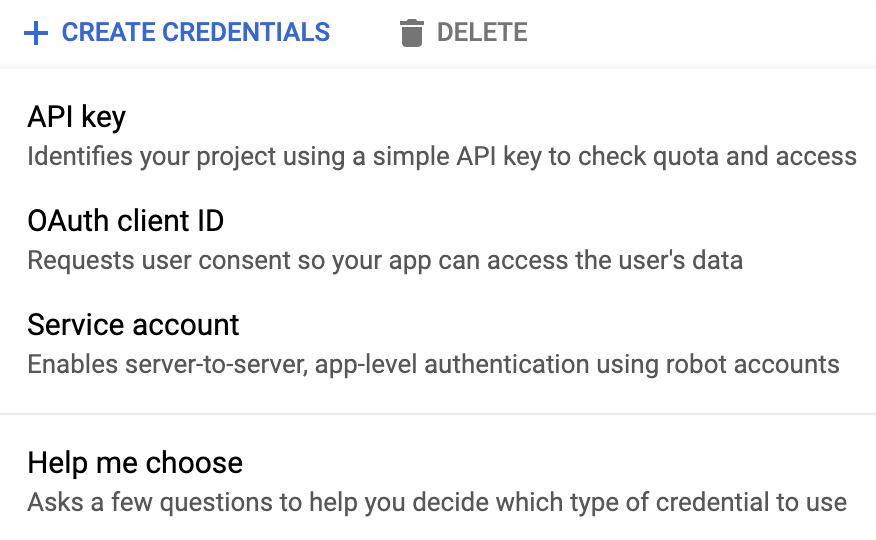
],Next we’ll get the client id and client secret from Google. Login to google developers console here: https://console.developers.google.com/apis/credentials?pli
Click Create Credentials -> Oauth Client Id and choose Web Application from the dropdown.
Give the key a name that’s easy to remember. Fill in the URI, and the callback URI. In this case we can name it socialite, and the URI will be http://localhost and the callback will be http://localhost/auth/google/callback.
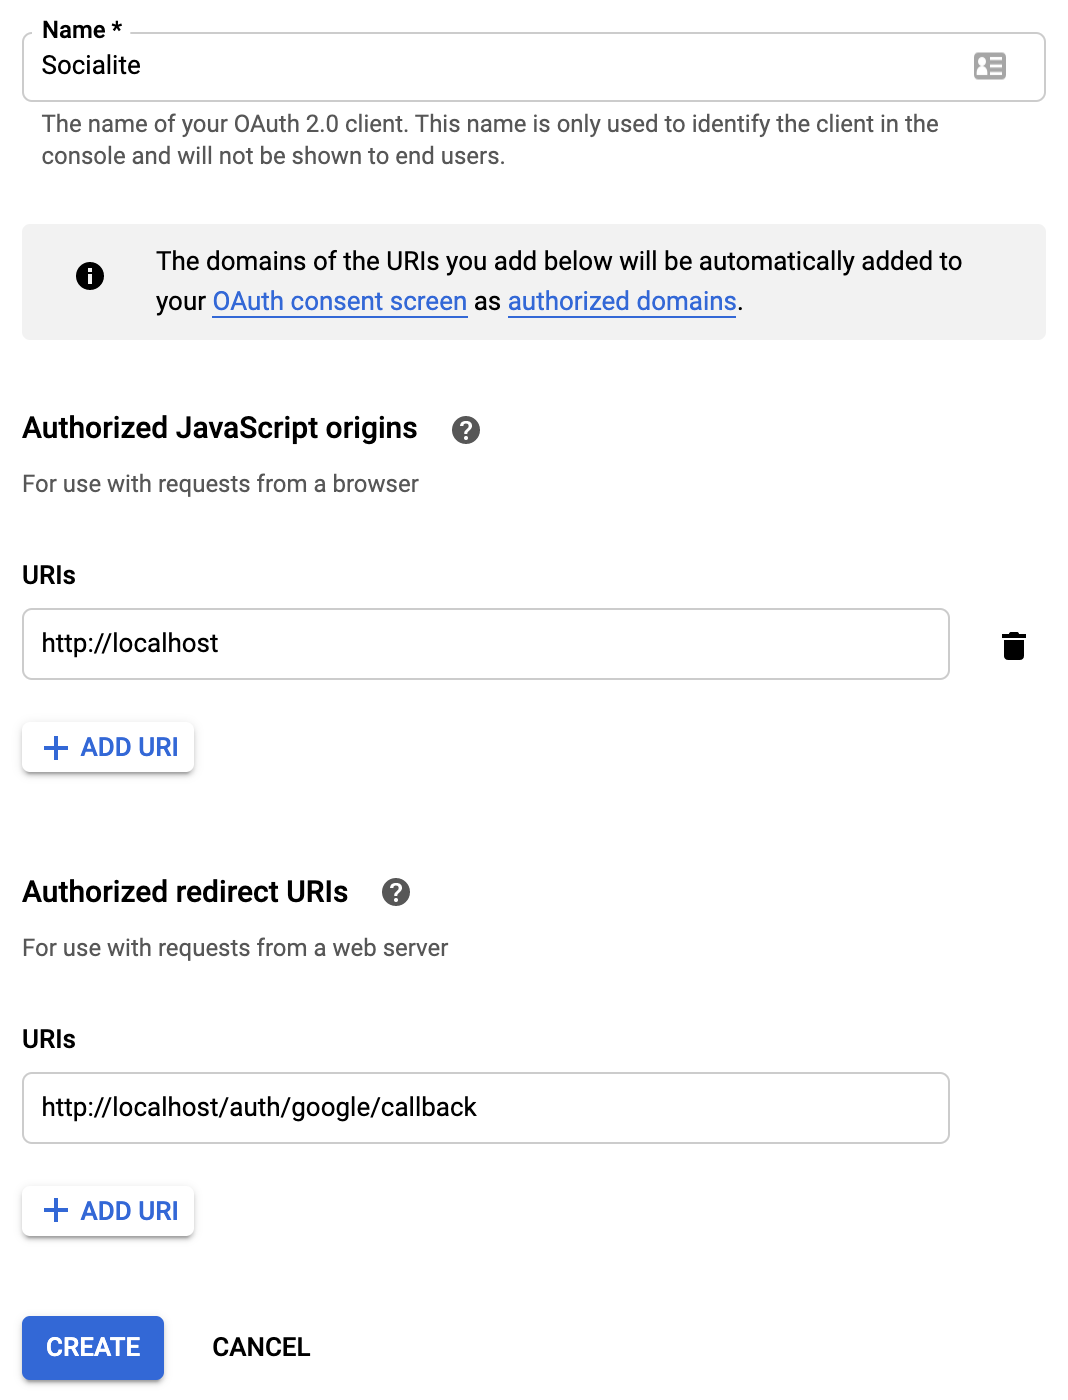
Click CREATE and then copy the client id and the client secret to the .env as GOOGLE_CLIENT_ID and GOOGLE_CLIENT_SECRET
Next, add google_id to the user database.
php artisan make:migration add_google_id_columnAdd google_id to the user model by adding it to App\Models\User.php
protected $fillable = [
'name',
'email',
'password',
'google_id'
];
Add the routes to routes\web.php
Route::get('auth/google', [LoginController::class, 'redirectToGoogle']);
Route::get('auth/google/callback', [LoginController::class, 'handleGoogleCallback']);
I didn’t have App\Http\Controller\Auth so I made the directory and put LoginController in there. I had to code it to create a new user and a new team for the new user when they are created from a google login. After a few tries, this is my LoginController.php
namespace App\Http\Controllers;
use App\Http\Controllers\Controller;
use Laravel\Socialite\Facades\Socialite;
use Illuminate\Support\Facades\Auth;
use Exception;
use App\Models\User;
use App\Models\Team;

class LoginController extends Controller
{
    /**
     * Redirect the user to the GitHub authentication page.
     *
     * @return \Illuminate\Http\Response
     */
    public function redirectToGoogle()
    {
        return Socialite::driver('google')->redirect();
    }

    /**
     * Obtain the user information from GitHub.
     *
     * @return \Illuminate\Contracts\Foundation\Application|\Illuminate\Http\RedirectResponse|\Illuminate\Http\Response|\Illuminate\Routing\Redirector
     */
    public function handleGoogleCallback()
    {
        try {
            //create a user using socialite driver google
            $user = Socialite::driver('google')->user();
            // if the user exits, use that user and login
            $finduser = User::where('google_id', $user->id)->first();
            if($finduser){
                //if the user exists, login and show dashboard
                Auth::login($finduser);
                return redirect('/dashboard');
            }else{
                //user is not yet created, so create first
                $newUser = User::create([
                    'name' => $user->name,
                    'email' => $user->email,
                    'google_id'=> $user->id,
                    'password' => encrypt('')
                ]);
                //every user needs a team for dashboard/jetstream to work.
                //create a personal team for the user
                $newTeam = Team::forceCreate([
                    'user_id' => $newUser->id,
                    'name' => explode(' ', $user->name, 2)[0]."'s Team",
                    'personal_team' => true,
                ]);
                // save the team and add the team to the user.
                $newTeam->save();
                $newUser->current_team_id = $newTeam->id;
                $newUser->save();
                //login as the new user
                Auth::login($newUser);
                // go to the dashboard
                return redirect('/dashboard');
            }
            //catch exceptions
        } catch (Exception $e) {
            dd($e->getMessage());
        }
    }
}
Lastly, I added a link button on the blade view here: resources\views\auth\login.blade.php. This was taken directly from nicesnippets as mentioned above.
<a href="{{ url('auth/google') }}" style="margin-top: 0px !important;background: green;color: #ffffff;padding: 5px;border-radius:7px;" class="ml-2 btn-google">
<strong>Login With Google</strong>
</a>
After all this, the application allows a user to login with google, get a callback that logs the gmail user into your application, sets a personal team for the user, and enables the dashboard.
Now that authentication with google is sorted, you can code your application.


Comments
Post a Comment